

OFFICE-OSIS Or “Does your office make you sick?”
OFFICE-OSIS with Dr. Bob Niklewicz PT, DHSc, CEAS II “The Ergo Whisperer”
[Gr. – ōsis, fr. – sis] Suffix indicating condition, status, process, whether normal or diseased, or sometimes an increase.
It has been an “Interesting” year or two with life being tied up or twisted into knots from the Pandemic. We have had major life-style changes both in our home life as well as in our work situations. Many of us found that our home life and work life have melded into one location via the home office. Your Fortress of Solitude and now your home is one and the same.
If your home office has been your primary work location for all this time, you may have it set up like mine where: the computer, accompanying office equipment, supplies and support equipment (hot plate, music/sound system and possibly a small fridge) surround you. The home office may or may not be as efficient as your original office, but you go there to go to work and do what you must do. If it truly is like that, when you do leave, you get out and don’t look back until tomorrow.
The problem is that there probably is not a janitorial service to clean up the area at night. Wastebaskets, desktop flat spaces, floor spaces next to the desk, and some corners become full and cluttered beyond just the paper particles around the paper shredder. I won’t go into the half full coffee mugs from two days ago or the food wrappers tucked here and there, nor the dog or cat hair that was been attracted by places from floor level to even the second or third shelf next to your desk. IF any of that is close to your reality, then you have entered the “OFFICE-OSIS Zone” (OOZ).
Look around and honestly tell yourself if any of the issues above are true for you or is your OOZ, at the very least, good enough for now? Since you probably do not wear a mask in your home office, consider that over the last two years, you are not regularly getting fresh air into the room. Your skin drops millions of skin cells every day plus air borne germs, so you are probably sitting in a Petri Dish and/or lung unfriendly place. – So, the point is that it is time to clean the place up because you MIGHT have other creatures living around you that are not welcome. I will not add what might be involved IF you are sharing a keyboard or phone with other people.
In 2001 Clorox ™ did a study to determine the bacteria levels in/on the typical office cubicle environment. They were interested (of course) in what surfaces/equipment had the highest level of contaminants. They also wanted to know if wiping down surfaces and equipment make a difference in reducing illness-causing germs in the workplace. Yes, they were using Clorox Wipes ™ however, other disinfecting wipes should have similar findings.
NOTE: This was in an office situation. In health care facilities, there may be more virulent strains of bacteria and virus that do not respond as well to wipes and antibiotics. As this Newsletter is focused on home use, those virulent microbes will not be included in this post. Just be aware of that there can be more aggressive bugs out there and they can be anywhere depending on who uses the equipment and where they have been before getting to the home office. Also note, viruses are much tougher to kill than bacteria.
The surfaces tested were:
Desktop, phone, mouse, keyboard, microwave handle, printer start button, water fountain handle/button, refrigerator handle, and toilet seat.
The results found the top FIVE most germ-contaminated spots in order were:
PHONE, desktop, water fountain button/handle, microwave door handle, and keyboard.
The study found that on unwiped surfaces, bacteria levels increased as much as 31% compared to wiped surface during the course of a day. Wipes were used 3x/day versus not using wipes. The most consistent problem areas were where the hands rested regularly. Keyboard, wrist/palm rest, holding the phone etc. Those areas routinely had —wait for it—-10,000,000 bacteria/virus on those surfaces. (That is about 20,000 germs per square inch). Cold and flu viruses can last up to 3 days on surfaces. Wiping down the areas reduced microorganisms by 99%. The least contaminated surfaces were the Toilet Seats and photocopier buttons/surfaces. You figure out why. Oh, don’t forget the landing surfaces of bacteria or virus from a sneeze.
NOTE: A true disinfecting wipe MAY be too strong for delicate Computer equipment. A milder soap wipe may be enough to clean the surface without rubbing off the letters on the keyboard or corroding delicate contacts. Avoid wipes that are WET, you want just moist to avoid fluid running into equipment. Test the wipe on a back part of equipment if you are not sure it will be safe.
Soooo, let us look around and start with the big stuff.
Step #1. Clear out wrappers, mugs, plates, forks, shoes, and extra clothes on the chairs or floor and move them to the appropriate places. Think of these items as a “Bacteria Cafeteria”. Also, put books back on their shelves, papers into files or drawers. Those that are currently needed (I mean today or tomorrow) place them into appropriate files on the desk (not on the floor) or a TEMPORARY SPACE (TS) on a work surface away from the computer. You will retrieve them later after step #10.
Step #2. Anything that is lying on its’ side or leaning against something, reposition it to the appropriate drawer, shelf or file. If it is on the floor, pick it up and also file or shelf it. If any of those items are needed in the next day or two, place them in the TS.
Step #3. Once ALL the work surfaces below, around or above the primary desk area have been cleared of clutter, acquire a dusting device, like a Swiffer” ™ that will not just dust but also attract and hold dust particles. A handheld Vacuum (with a good filter) can be used if it has a small brush or crevice tool and can be used in tight places and on flat surfaces. Don’t forget to vacuum the office equipment surfaces around you.
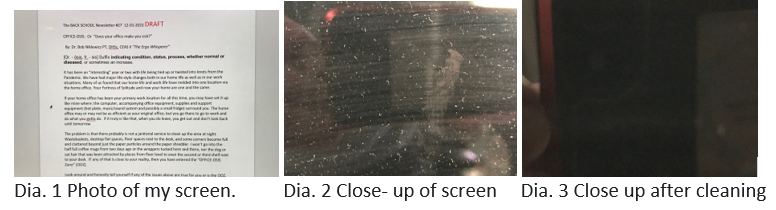
Step #4. Use an appropriate cleaner for your VDT in order to clean dirt and fingerprints from the screen even if it looks clean. Dia. 1. I use a Screen and Lens cleaner spray that I also use on my camera that is mild and safe on the screen. It is surprising how much dust and smudges accumulate on your screen, Dia. 2 and after Dia. 3. I then use a Disinfectant Wipe around the edges where the control buttons are located. Wipe and vacuum around the base of the screen(s). Especially where the pile of tangled wires is hidden or under the desk.
Step #5. The Keyboard (KB) and wrist/palm rest are key areas for collecting dirt and microorganisms. Cleaning the KB should be done with Isopropyl (Rubbing) alcohol (70%). Do not use Ethyl alcohol as it is much stronger and will wipe off the letters on the keyboard.
You can use a napkin or my favorite is the cotton tipped swab. DO NOT pour the solution onto the KB. –Very BAD idea. Dia. 4 shows a couple of keys that have grime around the sides. Dia. 5 is a cotton tip stick with one end clean and the other after being used between the keys.
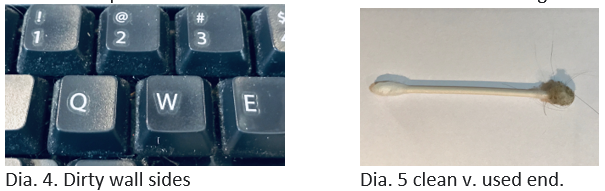
Before you say anything about my hygiene, I can assure you that I am not like “Pigpen” from Charlie Brown cartoons. The “Dirt” is debris that settles all around you. Comment about the dirt in the diagrams only AFTER you clean your own.
While you are in the area clean under the KB and your KB tray.
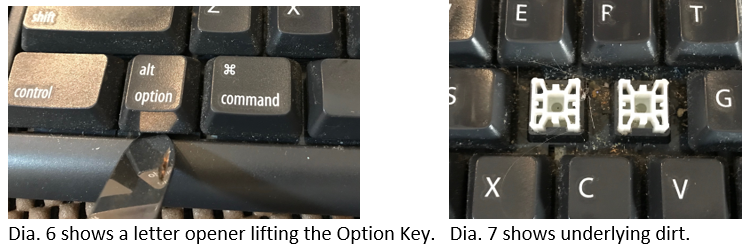
Step #6. REALLY dirty KB’s probably have crumbs and “Stuff” between and under the key buttons. You will have to pry these keys up and off. Be careful as they are fragile and can break. You may be able to pry them off with your finger nail or a wide flat blade. Dia. 6 shows the prying motion on a key. Dia. 7 shows two removed keys and the “stuff” found there. A cotton tipped stick and/or compressed air can be used to loosen and remove the debris. Remember NOT to mix up your keys while cleaning. Lay them out correctly and replace them accordingly.
Continue this process for all keys. It could take an hour if you are careful. NOTE: Be careful with the space bars. They are a little more complicated and they have a small spring under them, but they can be safely removed and then replaced if you are gentle and don’t hurry the process.
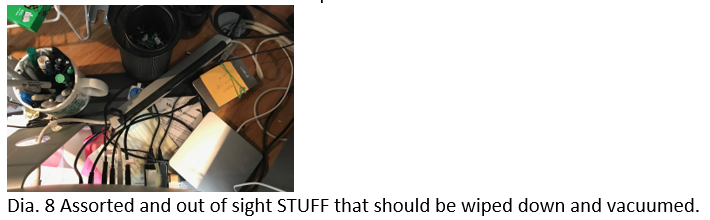
Step #7. Clean your mouse with a cloth moisten with the Isopropyl alcohol solution. Also wipe down the wrist / palm rests. Clean behind the VDT and the wires and stuff behind the VDT’s such as seen in Dia. 8. You will be surprised what has been lost back there. Clean it too.
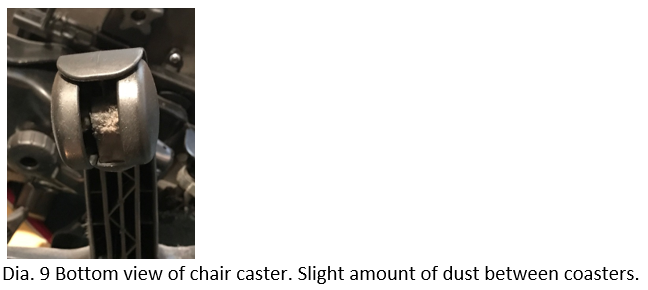
Step #8. Wipe down the armrests of your chair. Also wipe down the base and legs of the chair. Give special attention to the wheel that always collect hair and dust on and in them. Dia. 9.
NOTE: The wheels of my chair look pretty good as I do not have pets around the house, and I lost most of my hair decades ago. So, a little wipe and air spray and I am good to go.
If you have a fabric covered cushions, spend extra time vacuuming them. If it is mesh or vinyl, wipe down with a disinfectant solution.
Step #9. Vacuum deep into the corner and along baseboard under and behind your desk.
Step #10. Replace items to Neutral positions and enjoy the view and clean spaces. Remember to take your ERGO BREAKS every 30 minutes. If you lost your exercise handout, contact our office and we will email you a copy. Check your work area again in a couple of months for general cleaning. Use the wipes frequently, and don’t leave the dishes on the desk or in the sink for very long. You and I know what I mean by that.
Have any office cleanliness tips? Let us know in the comments!
Disclaimer: This article is strictly informational on hiding places environmental hazards and the need for cleaning/disinfecting equipment as they effect office work situations and for the safety of those who enter your cubicle.
